GoMMCExplorerIntroductionGoMMCExplorer is a PC-based utility for 'exploring' your GoMMC card.It allows you to add, remove or rename discimages, tools or filingsystems to your GoMMC via a GUI. The utility works with MMC-cards used by the GoMMC made by John Kortink. InstallationDownload setup.exe (see the main page) and run it. You can select the directory where GoMMCExplorer should be installed.You don't have to uninstall previous versions. StartingAfter starting up, you see the splash-screen (see right). It shows the name of the application and the version. You can also view this splash-screen by selecting Help|About.GoMMCExplorer will try to detect your MMC-drive, detect the size of the inserted MMC-card, check if it is formatted with the GoMMC filing system and read the GoMMC-directory. If you have more than 1 MMC-card inserted, then it will default to the first valid card. Change the default drive in the Settings. |
|
|
Main screen
After starting with a formatted and populated GoMMC-card in the reader, you'll see the screen below.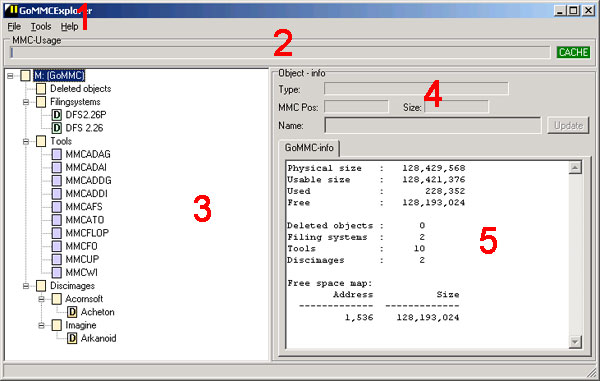
Menus (1)
At the top of the screen are three menu-items.- File|Refresh Tree - This will build the tree again. No info is read from the MMC. Use this option if you changed the node-break option in the Settings.
- File|Reload MMC - Use this option when you've inserted another MMC-card in the MMC-drive or if you defined another drive-letter in the Settings. This
option is not available when there's data in the cache (cache-light is red).
- File|Exit - Guess.
- Tools|Backup GoMMC - Backup all files currently on the GoMMC to disk. Only available when a GoMMC-formatted card is inserted and there's at least one object on the GoMMC.
- Tools|Restore GoMMC - Restore a previously made backup. Not available when no valid GoMMC-formatted card in the MMC-drive.
- Tools|Remove deleted objects - Delete all objects from the 'deleted objects'-treenode. Use this to create some space on the card.
- Tools|Format MMC... - After confirmation, formats the MMC-card to its maximum capacity.
- Tools|Settings... - Opens the Settings-dialog
- Help|Check for updates... - Checks if an updated version is available. Only the exe-name ('GoMMCExplorer.exe') and it's version are sent to the website, no other information.
- Help|About - Shows the about-screen.
MMC-Usage and Cache-status (2)
|
This panel contains a graphical representation of the used space on the MMC-card. If you hover over the bar, it will show you the percentage of used space.
The used space is the total space used by the GoMMC filing system. It is possible to have free space but adding objects is not possible because the free space is fragmented. Click on this bar to see the zoomed-in free space distribution. Rightside is the start of the first object occupying space on the MMC, leftside is the last occupied byte on the MMC. So the catalogue, and the gap between the end of the catalogue and the first object, are not shown. At the bottom of the zoomed-in bar you can see a little red or green bar. That bar shows which part of the MMC is currently in the cache of GoMMCExplorer. Red indicates some bytes-to-be-written are in the cache, green indicates there's only read-only cached data. On the right you see the cache-light. When it's red, GoMMCExplorer has some unwritten data in it's cache. Don't remove the MMC-card! Press the cache-light to flush the cache. When the light is green there's no unwritten data in the cache. You can safely remove the MMC-card. |
|
 |
Tree (3)
This tree shows the the contents of the card (if GoMMC-formatted).The top-level node will show the drive-number and, between brackets, the status:
- no device defined - You have no MMC-drive attached or you've defined an unknown drive-letter (see the Settings).
- no MMC present - The MMC-drive is detected, but contains no MMC-card.
- no GoMMC filingsystem - A MMC-card has been detected, but it has not been formatted with the GoMMC filing system.
- GoMMC - You have a GoMMC-formatted card in the reader. Congratulations!
The top-level node contains 4 subnodes:
- Deleted objects - This node contains the deleted objects on your GoMMC-card (kind of a recycle bin). You can trash these objects by rightclicking
on this subnode and selecting 'Remove deleted objects'. Or use the same Tools-submenu.
- Filingsystems - This node contains the filingsystems on the GoMMC-card.
- Tools - This node contains all the tools you uploaded to the GoMMC-card.
- Discimages - This node lists all the discimages on the GoMMC-card. This is the only node which can have subnodes.
A subnode will be created when the name of the object contains a dot ('.'). You can define the maximum number of subnodes, see the Settings.
Different icons are used in the tree:
 - Every node and unknown objects
 - Deleted objects
 - Objecttype 'Filingsystem - DFS'
 - Objecttype 'Filingsystem - DFS (patched)'
 - Objecttype 'Filingsystem - DNFS'
 - Objecttype 'Filingsystem - DNFS (patched)'
 - Objecttype 'Filingsystem - ADFS'
 - Objecttype 'Filingsystem - ADFS (patched)'
 - Object 'Tool'
 - Object 'Discimage - DFS'
 - Object 'Discimage - DFS (squashed)'
 - Object 'Discimage - ADFS'
 - Object 'Discimage - TAPE'
Leftclick then rightclick a node or object to 'do something' with that node or object. You can select multiple objects with SHIFT and/or CTRL if you like.
If you leftclick an object, more detailed info of that object will be shown in (4) and (5).
You can also press INSERT to add objects, DEL to delete objects and F5 to refresh the tree.
Objectinfo (4)
This panel shows some basic info of the object you selected in the tree.The MMC-address and the size can be shown in hex or decimal. See the Settings.
Detailed Objectinfo (5)
This section shows more detailed info about the object selected in the tree.When the setting 'Autoview' (Settings, tab Viewer) is checked, it will show the info of the selected object The information shown depends on what you selected in the tree:
- Tree root - Info is shown about the MMC and the GoMMC filing system.
It shows the physical size, the usable size (there's a 8K safetyzone at the end of the MMC) and the used and free space.
The second part shows the number of objects by objecttype.
The last part is the free space map. Here you can see how fragmented your GoMMC is. GoMMCExplorer will always try to use the smallest piece of free space if you add an object.
Numbers can be shown in hex or in decimal. See the Settings.
- Deleted object - Simple hexdump
- Tool - Simple hexdump
- Filing system - Simple hexdump
- Discimage - For DFS-objects: the catalogue. Although GoMMCExplorer can only add .SDD-images to the GoMMC, it can shown the
catalogue of not-squashed multi-side discimages (every side it's own tab). No info will be shown for ADFS- or TAPE-images.
Settings
Use the Settings-menu to adjust GoMMCExplorer the way you like it. Select Tools|Settings... to open de Settings-window.You'll see 5 tabs.
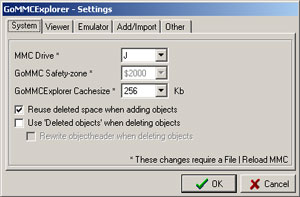
System
|
MMC Drive This is the MMC-drive in which your GoMMC-card lives. The dropdown-box lists all drives which Windows sees as 'Removable' (except drive A:). GoMMC Safety zone Some MMC-cards do not function correctly when reading the last few sectors, so the GoMMC doesn't use the last 8Kb (=$2000 bytes). This option can not be modified (although it can be in the registry), but this is NOT recommended. The physical GoMMC expects a safetyzone of 8K. Any other setting will not work correctly. GoMMCExplorer Cachesize GoMMCExplorer caches data it reads/writes from/to the MMC-card. Bigger values decrease the number of MMC-reads/writes needed, but increase the time these writes take. This value should be bigger than the size of discimages you normally work with, so 256K should be fine if you work a lot with non-squashed .SSD-images. Reuse deleted space when adding objects With this option checked, GoMMCExplorer will reuse empty space (the blocks mentioned in the free space map). Leave this option checked for optimal MMC-use. Use deleted objects when deleting objects If you delete an object with this option checked, the object will not really be deleted, although the physical GoMMC won't see it anymore. It's like the Windows Recycle bin. Normally there's no need to enable this option. Rewrite objectheader when deleting objects There are two copies of the catalogue-entry for an object: One in the catalogue, and a copy just in front of the object. This copy can (in theory) be used to restore the object if the catalogue is corrupted. If this option is checked, the copy will also be updated and marked as 'deleted'. The drawback is that there is no way to tell which type (tool, fs, discimage) this object was. Because 'undeleting' is not implemented yet, the last two options are of no practical use (yet). |
|
 |
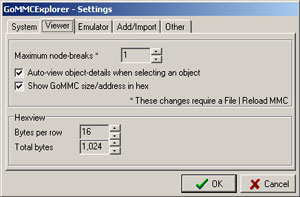
Viewer
|
Maximum node-breaks In the tree, the discobjects can have subnodes. Every time a dot ('.') in the name of an object is found, a subnode is created, up to the maximum number of subnodes defined here. This way you can group your objects together. Suppose an object is named 'Acornsoft.Elite.game'. If you set the node-breaks to 0 (zero), the Discimages has no subnodes, but only one child named 'Acornsoft.Elite.game' (the image itself). If you set the node-breaks to 1, the Discimages has one subnode 'Acornsoft'. That node has no subnodes, but only one child named 'Elite.game' (the image itself). If you set the node-breaks to 2, the Discimages has one subnode 'Acornsoft'. That node has one subnode 'Elite' which has one child named 'Elite.game' (the image itself). Because GoMMCExplorer does not store any 'own' information on the MMC-card but only relies on 'native' GoMMC-information, it's not possible to define own groups. If you want to define a group 'StairwayToHell' you have to name the object 'StairwayToHell.Acornsoft.Elite.game' and set the node-breaks to (at least) 1. See the image on the right for a node-breaks setting of respectively 0, 1 and 2. Auto-view object details when selecting an object When this option is checked and you select an object in the tree, it's detailed info is automatically displayed in the right pane (area 5 in the picture above). It takes some time to read the info off the GoMMC, especially when you have a big cache-size and you're only interested in the global details (area 4). When you uncheck this option, the text 'Click to load details from GoMMC' will be displayed in the right pane. When you click the pane, the detailed info will be shown. Show GoMMC size/address in hex When checked, almost all numbers will be shown in hex. When not checked, those numbers will be shown in decimal. This option does not influence the way numbers in DFS-catalogues are shown. Those numbers will always be displayed in hex. For every object a hexview will be shown (in the right pane, area 5). Here you can configure the way the hexview will be shown. Bytes per row This option selects how many bytes the hexview should display on a row. Total bytes With this option you can select how many bytes will be read from the object you selected. |
|
  |
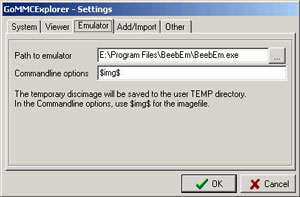
Emulator
|
Path to emulator Here you enter the complete path including the filename of your favorite Beeb-emulator (or select it with the '...'-button). When you've entered something here, a rightclick on an discimage in the tree will show the extra menu-item 'Open in Emulator'. When you select that menu-item, a temporary file 'GoMMCEmulatorImage.ssd' will be created in the user-temp-directory, and the emulator will be opened. Commandline options Enter the options which should be appended to the above mentioned path/filename. The sequence $img$ will be replaced with the full path of the temporary file ('GoMMCEmulatorImage.ssd' in the user-temp-directory). |
|
 |
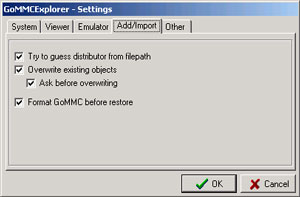
Add/Import
|
Try to guess distributor from filepath When you import a discimage, GoMMCExplorer uses the title of the disc (the DFS-title) as the name of the object. If no name is found, it used the filename. If you check this option, GoMMCExplorer will also try to guess the distributor from the imported filepath and add it to the name. For example, if you try to add 'F:\Acorn\disks\Acornsoft\Elite\Elite.ssd', it will extract the name 'Acornsoft' from that path. So the name of the object will be 'Acornsoft.Elite' (presuming the DFS-title is Elite). Overwrite existing objects With this option checked, objects with the same name will be overwritten. When this option is not checked, you can have two objects with the same name. The physical GoMMC will only be able to access the first object with that name, the second cannot be selected. So it's wise to leave this option checked. Ask before overwriting When this option is checked, GoMMCExplorer will ask you to confirm the overwriting of an existing object. This option is of course only enabled when the previous option is enabled. Format GoMMC before restore When you restore a complete GoMMC, you probably want to start with a clean GoMMC. When this option is enabled, GoMMCExplorer will (after a confirmation) format the GoMMC first. If this option is not checked, the imported objects will be merged with the existing objects. Depending on the setting of the 'Overwrite'-options, it's possible to have multiple objects with the same name after a restore! |
|
 |
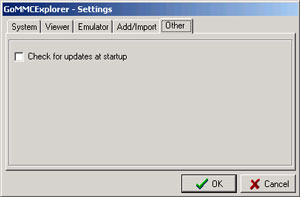
Other
|
Check for updates at startup I think you know it. When checked, GoMMCExplorer will check for updates. If there are no new updates, the update-window will close after a few seconds. If there are any updates, click the URL at the bottom of that window to go to the website. |
|
 |
Adding objects
Every 'add'-option is done via the 'Add Objects' dialog. You can reach this dialog by pressing INSERT in the tree, by right-clicking in the tree and selecting 'Add Objects' or by dropping discimages (or other objects) on GoMMCExplorer. Even the 'Restore GoMMC' option relies on the 'Add Objects' dialog.After executing one of the above actions, you'll see the next window:
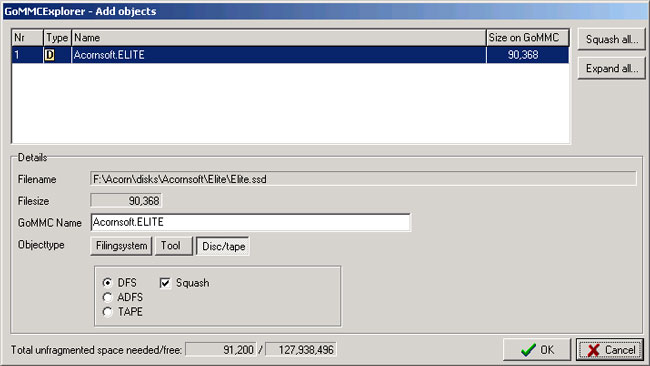
Now you can press INSERT to add files to this dialog, or drop files on them. GoMMCExplorer tries to analyze what kind of file it is (Tool, Filingsystem of Discimage). Change the type of file with the buttons and boxes beneath the file-list.
The file-sizes at the bottom of the dialog refer to unfragmented space.
Filingsystem
Select the filingsystem you imported. Beware that the option Patched does NOT patch the filingsystem. It just indicates you want to import the filingsystem with the property Patched selected. So the selected file should be patched already.
Tool
Nothing to say about it.
Discimage
If you check squash for a DFS-disc, GoMMCExplorer tries to minimize the size of the imported object as much as possible. Beware that if you mount this object on the physical GoMMC, you can not append any files to it! So if you want to write any more files to a discimage (for example saved games from Elite), do not squash it!
Backup/Restore
After selecting Tools|Backup GOMMC you are asked for a filename. Default this is yyyymmdd.txt.When you press 'Save', a subdirectory with the same name will be created.
The textfile holds the type and name of every object backed up, the subdirectory contains the objects:
	GoMMCExplorer Backup (10/30/2005 22:05:39)
	 3  1 00018400 3D4C8200 IMG00000.bin AcornUser.GraphicsUtils02
	 3  1 00009000 3D4EE600 IMG00001.bin Compilation.DigDemo
	 3  1 00016E00 3D4F7800 IMG00002.bin AcornUser.GraphicsUtils01
After selecting Tools|Restore GoMMC you are asked for a textfile. That's the textfile you see above.
All lines of the textfile are read and added to the Add Objects-dialog. Change the names and types as you like.
Well...
I think that's all that needs to be explained. If you have any questions or remarks, just drop me a line.Have fun!
Back to the main page